Graphics Fill
If you're new to graphics, check out the graphics guide first. This guide covers fill() in depth. The fill() method lets you fill shapes with colors, textures, or gradients.
The fillStyles discussed here can also be applied to Text objects!
Basic color fills
Fill a Graphics object with a color using the fill() method:
const obj = new Graphics()
.rect(0, 0, 200, 100) // Create a rectangle with dimensions 200x100
.fill('red'); // Fill the rectangle with a red color
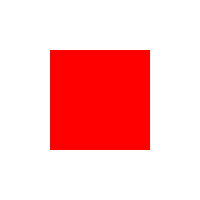
This creates a red rectangle. PixiJS supports multiple color formats:
- CSS color strings (e.g., 'red', 'blue')
- Hexadecimal strings (e.g., '#ff0000')
- Numbers (e.g.,
0xff0000) - Arrays (e.g.,
[255, 0, 0]) - Color objects for precise color control
Examples:
// Using a number
const obj1 = new Graphics().rect(0, 0, 100, 100).fill(0xff0000);
// Using a hex string
const obj2 = new Graphics().rect(0, 0, 100, 100).fill('#ff0000');
// Using an array
const obj3 = new Graphics().rect(0, 0, 100, 100).fill([255, 0, 0]);
// Using a Color object
const color = new Color();
const obj4 = new Graphics().rect(0, 0, 100, 100).fill(color);
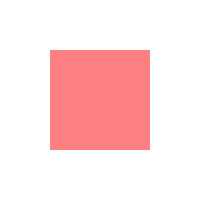
Fill with a style object
For more control, pass a FillStyle object to customize properties like opacity:
const obj = new Graphics().rect(0, 0, 100, 100).fill({
color: 'red',
alpha: 0.5, // 50% opacity
});
Fill with textures
Fill shapes with textures:
const texture = await Assets.load('assets/image.png');
const obj = new Graphics().rect(0, 0, 100, 100).fill(texture);
Local vs global texture space
Textures can be applied in two coordinate spaces:
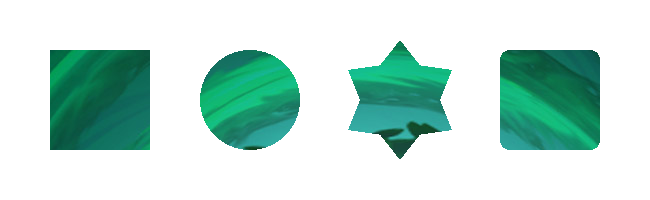
- Local space (default): Texture coordinates are mapped relative to the shape's dimensions. The coordinate system is normalized where (0,0) is the top-left and (1,1) is the bottom-right, regardless of pixel dimensions. A 300x200 texture filling a 100x100 shape gets scaled to fit within those 100x100 pixels.
const shapes = new Graphics()
.rect(50, 50, 100, 100)
.circle(250, 100, 50)
.star(400, 100, 6, 60, 40)
.roundRect(500, 50, 100, 100, 10)
.fill({
texture,
textureSpace: 'local', // default!
});
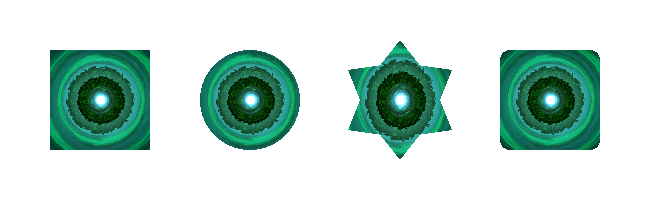
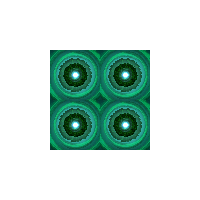
- Global space: Set
textureSpace: 'global'to make the texture position and scale relative to the Graphics object's coordinate system. Despite the name, this isn't truly "global"; the texture remains fixed relative to the Graphics object itself, maintaining its position when the object moves or scales:
const shapes = new Graphics()
.rect(50, 50, 100, 100)
.circle(250, 100, 50)
.star(400, 100, 6, 60, 40)
.roundRect(500, 50, 100, 100, 10)
.fill({
texture,
textureSpace: 'global',
});
Using matrices with textures
Apply a transformation matrix to modify texture coordinates (scale, rotate, or translate). Learn more about texture mapping transforms.
const matrix = new Matrix().scale(0.5, 0.5);
const obj = new Graphics().rect(0, 0, 100, 100).fill({
texture: texture,
matrix: matrix, // scale the texture down by 2
});
Texture gotchas
- Sprite Sheets: Texture fills use the entire source image, not the cropped frame. To fill with a specific spritesheet frame, render it to a standalone texture first:
const frame = Sprite.from('myFrame.png'); // a spritesheet frame
const standalone = renderer.generateTexture(frame);
const obj = new Graphics().rect(0, 0, 100, 100).fill(standalone);
- Power of Two Textures: Textures should be power-of-two dimensions for proper tiling in WebGL1 (WebGL2 and WebGPU are fine).
Fill with gradients
PixiJS supports both linear and radial gradients via the FillGradient class.
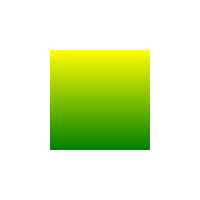
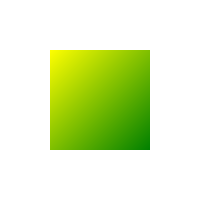
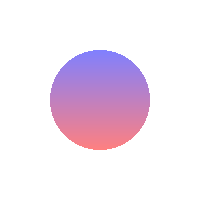
Linear gradients
Linear gradients create a smooth color transition along a straight line:
const gradient = new FillGradient({
type: 'linear',
colorStops: [
{ offset: 0, color: 'yellow' },
{ offset: 1, color: 'green' },
],
});
const obj = new Graphics().rect(0, 0, 100, 100).fill(gradient);
You can control the gradient direction with the following properties:
start {x, y}: Where the gradient begins, in normalized coordinates (0 to 1).{x: 0, y: 0}= top-left,{x: 1, y: 1}= bottom-right.end {x, y}: Where the gradient ends, same coordinate space.
Common patterns:
- Horizontal (default):
start: {x: 0, y: 0},end: {x: 1, y: 0} - Vertical:
start: {x: 0, y: 0},end: {x: 0, y: 1} - Diagonal:
start: {x: 0, y: 0},end: {x: 1, y: 1}
const diagonalGradient = new FillGradient({
type: 'linear',
start: { x: 0, y: 0 },
end: { x: 1, y: 1 },
colorStops: [
{ offset: 0, color: 'yellow' },
{ offset: 1, color: 'green' },
],
});
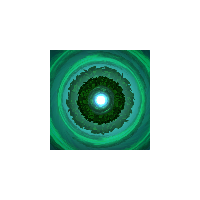
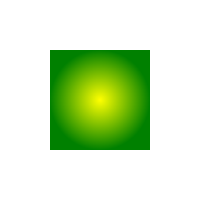
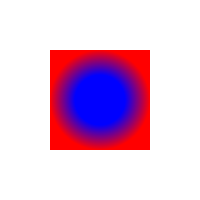
Radial gradients
Radial gradients create a smooth color transition in a circular pattern, blending colors from one circle to another:
const gradient = new FillGradient({
type: 'radial',
colorStops: [
{ offset: 0, color: 'yellow' },
{ offset: 1, color: 'green' },
],
});
const obj = new Graphics().rect(0, 0, 100, 100).fill(gradient);
You can control the gradient's shape and size using the following properties:
center {x, y}: Center of the inner circle (normalized, 0-1). Default{x: 0.5, y: 0.5}= shape center.innerRadius: Radius of the inner circle (normalized). The gradient starts here.outerCenter {x, y}: Center of the outer circle. Usually the same ascenter.outerRadius: Radius of the outer circle. The gradient ends here.
The gradient transitions between the two circles. Set a small innerRadius and larger outerRadius to create a spotlight effect where the center color holds before blending outward.
const radialGradient = new FillGradient({
type: 'radial',
center: { x: 0.5, y: 0.5 },
innerRadius: 0.25,
outerCenter: { x: 0.5, y: 0.5 },
outerRadius: 0.5,
colorStops: [
{ offset: 0, color: 'blue' },
{ offset: 1, color: 'red' },
],
});
const obj = new Graphics().rect(0, 0, 100, 100).fill(radialGradient);
Gradient gotchas
-
Memory Management: Use
fillGradient.destroy()to free up resources when gradients are no longer needed. -
Animation: Update existing gradients instead of creating new ones for better performance.
-
Custom Shaders: For complex animations, custom shaders may be more efficient.
-
Texture and Matrix Limitations: Under the hood, gradient fills set both the texture and matrix properties internally. This means you cannot use a texture fill or matrix transformation at the same time as a gradient fill.
Combining textures and colors
Combine a texture or gradient with a color tint and alpha to overlay a color on top, adjusting transparency with the alpha value.
const gradient = new FillGradient({
colorStops: [
{ offset: 0, color: 'blue' },
{ offset: 1, color: 'red' },
],
});
const obj = new Graphics().rect(0, 0, 100, 100).fill({
fill: gradient,
color: 'yellow',
alpha: 0.5,
});
const obj = new Graphics().rect(0, 0, 100, 100).fill({
texture: texture,
color: 'yellow',
alpha: 0.5,
});
